FREE UK Standard Delivery. EU shipping now just £14.95.
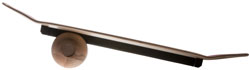


How to do Snowboard Heel Turns on a Vew-Do Balance Board - First, find your center of balance on the board. This is easily done by positioning your body evenly over the rock with your knees slightly bent and your back straight. Then maneuver yourself into your snowboarding stance. For heel turns, slightly shift your weight back on your heels by bending your knees and elevating your toes.

When you do this, you will automatically engage the taper in the rock. Careful Sparky, too much lean and you'll end up jumping off the board like a gymnast that just double-stepped a dismount. So keep yourself balanced.
Keep your body centered over the rock and bend either knee while simultaneously straightening the opposite leg. Only a small amount of straightening is needed to set the board in motion. The board will start to move in the direction of the straightened leg to start.


Proprioception will almost automatically induce you to roll your hips over the rock to maintain your balance on the board. Stay balanced over the rock, gravity will take over the physics of moving the board.
Simulating a snowboard heel turn on the balance board is activated by pushing the trailing foot heel in the direction you want to turn. The forward foot pulls into the direction of the turn and acts as a steering wheel to set the arc and angle of the turn. The more you push-pull, the tighter the turn will be.

After reaching the stops at the end of the board, repeat the same sequence by straightening the opposite leg. Maybe without even realizing it, you're also teaching yourself how to correctly use your snowboard edges for carving.
Too much bite and you'll lose your balance and fall off the board. Not enough bite and you won't engage the taper in the rock. What you're doing is creating muscle memory in the best sport specific environment outside of actually being on a snowboard.
How to do Snowboard Toe Turns on a Vew-Do Balance Board - In the same way you did on the heel turn, find your center of balance on the board. This is easily done by positioning your body evenly over the rock with your knees slightly bent and your back straight. Then again, maneuver yourself into your snowboarding stance.
For toe turns, slightly shift your weight forward onto the balls of your feet by bending your knees and elevating your heels. When you do this, you will automatically engage the taper in the rock. Keep your body centered over the rock and bend either knee while simultaneously straightening the opposite leg. Just like the in the heel turn, only a small amount of straightening is needed to set the board in motion. The board will start to move in the direction of the straightened leg to start.
Now, your hips will naturally roll over the rock as the board moves to help you maintain your balance. Stay balanced over the rock, gravity will take over the physics of moving the board.
Simulating a snowboard toe turn on the balance board is activated by pushing the trailing foot toes in the direction you want to turn. The forward foot pushes into the direction of the turn and acts as a steering wheel to set the arc and angle of the turn. (Photo 7) Again, the more you push-pull, the tighter the turn will be.

Reaching the end stops requires you to repeat the sequence to continue your roll across the rock. Too much bite from the toes and you'll lose your balance. Not enough bite and the rock won't engage.
The best way to get the most out of snowboard training on a Vew-Do balance board is to master this - Switch from a heel turn to an opposite stance toe turn each time the board spans the rock. Then switch from a toe turn to an opposite direction heel turn. Eventually, you will want to turn your head, eyes, shoulders and hands in the direction you want to travel thereby initiating the turn with your upper body. From there it's onto rotations but we will save that for another lesson.
There you have it. Snowboarding heel turns and toe turns on a Vew-Do Balance Board. That's the basics of snowboard balance board training.
By: Rick Contrata